Talking about the second episode of Siltbreaker, the Act 2 guide has a connection to Act 1. That’s why you should get the needed advantage to complete Act 2 rather than being a tryhard and avoid the help you can get. Some of the Artifacts you’ve gotten in Siltbreaker Act 1 are more than needed to accomplish Siltbreaker Act 2. After the first defeat of Siltbreaker, it will become even easier to achieve it because the deeper you go, better the Artifacts you get.
Siltbreaker Act 2 Step-By-Step Guide
We’re here to help you get the very first win. We’ve been trying to determine the best pick for two days, and we’ve finally managed to deal with the Siltbreaker himself. The secret lies behind one Artifact that drops in Siltbreaker Act 1, and that’s the Unhallowed Icon. That’s the Artifact who makes your life a whole lot easier, at least in Siltbreaker 2 :). So, before you decide to queue for Siltbreaker Act 2, find one guy that owns the Unhallowed Icon Artifact. The Second most important Artifact is the Carapace of Qaldin. It will help you tank quite a lot of damage.
![]()
For that to work, you’ll have to get any lifesteal item on your two cores, Sven and Luna. Therefore, they’ll get their Satanic later in the game.
At this moment, we just lack the three stars on the boss, but everything else we’ve achieved so far is at a max level. Hopefully, this guide will help you make the same.

Picks & Early Game Ability Pickup
- Luna – Damage Dealer, Trash Cleaner
- Witch Doctor – Disable, Healer, Magic Damage
- Sven – Damage Dealer, Trash Cleaner, Tank
- Zeus – Magic Damage, Trash Cleaner
Regarding the items, the same rule as in Siltbreaker Act 1 applies, and that’s to aim only at end game items.
Early Game Level-up
- Luna – Lunar Blessing, Moon Glaive
- Witch Doctor – Paralyzing Cask, Voodoo Restoration
- Sven – Storm Hammer, Greater Cleave
- Zeus – Arc Lightning, Static Field
Step-By-Step Zone-by-Zone Items
Whitecap Lake
Assuming the beginning is easy to pass, we’ll jump the first zone in this guide and start from Whitecap Lake which is the second zone. That’s where the item creation begins to matter. In this area, using the Paw of Lucius Artifact is more than good. As soon as you hit level 5 the artifact will start working, and you’ll kill the Ogre Seals a lot easier. Also, Karaul Silverwing will have a rough time against it. Now, let’s jump onto the items. Keep in mind that you might not finish the items in this zone, but these are the very first everyone should focus doing.
Useful Artifact: Paw of Lucius
- Luna – Sange and Yasha
- Witch Doctor – Arcane Boots and Mekansm into Guardian Greaves
- Sven – Mask of Madness.
- Zeus – Arcane Boots, Veil of Discord
Veil of Discord will help that Magical Damage have an actual purpose in Siltbreaker Act 2. After killing Karaul Silverwing, it’s time to go to Iceblight Plateau.
Iceblight Plateau
Sadly, you won’t get a chance to improve your items by far, and that’s perfectly okay. The only necessary change over here the Guardian Graeves on Witch Doctor, as they’ll help you avoid the Ice Giant’s Chain Frost.
- Luna – Sange and Yasha
- Witch Doctor – Guardian Greaves
- Sven – Mask of Madness.
- Zeus – Arcane Boots, Veil of Discord
There’s a little trick for which I am not certain everyone knows about. Whenever you get hexed by the Ice Frost Giants, the Cold status effect Resets. It may help you sometimes. Keep that in mind. There are some good routes to avoid dying from the Cold, and we’ll include them later in a video. Now, before you encounter the Iceblight Plateau Boss, Storegga, you want to improve your items.
Useful Artifacts: Paw of Lucius, Cloak of the Bear, Ambient Sorcery
Sven’s and Luna’s Item Upgrades:
- Luna – Sange and Yasha, Crystalis
- Witch Doctor – Guardian Greaves
- Sven – Mask of Madness, Crystalis
- Zeus – Arcane Boots, Veil of Discord, Starts working on his Aghanim’s
There’s not much of an explanation on how to fight Storegga except to avoid standing in one spot. His throws are 2-3 seconds late, so if you’re on a constant move, he’ll miss for sure. The second part is the Thunder Clap ability. He casts this ability when he’s around half of HP. It is easy to avoid it, just do not try to dodge it in the direction where you came from. Otherwise, he may throw a rock over there and block your way if you die and respawn. It’s pretty much a dead Siltbreaker run from there, and you’ll be pushed to restart.
After he dies, most of the time he drops Sange or Solar Crest. Sange will suit Sven’s item progress, as he’ll be getting the Sange & Yasha too, while Solar Crest is alright on Witch Doctor.
Crypt of the Odobenus Legion
This is one of my favorite areas of the Scenario. The Odobenus Wraith is so fun to play against, and sometimes they might be quite annoying I must admit. We’ve found an awesome way of stopping them by using one artifact, Ice Dragon Maw.
Ice Dragon Maw will freeze them, so you and your team will be able to burst them down fast.
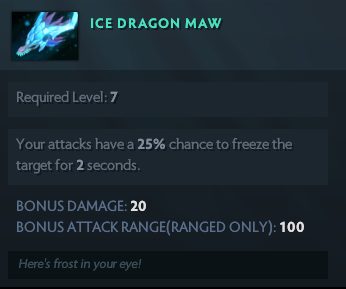
By saying that, if anyone from Sven and Luna owns this artifact, it’s good to equip it. Now let’s see the item progress and useful Artifacts in this area.
Useful Artifacts: Ice Dragon Maw, Ambient Sorcery, Craggy Coat, Cloak of the Bear.
Item Progress:
- Luna – Sange and Yasha, Crystalis, Morbid Mask
- Witch Doctor – Guardian Greaves
- Sven – Mask of Madness, Crystalis, Sange and Yasha
- Zeus – Arcane Boots, Veil of Discord, Aghanim’s Scepter
This is more than enough to pass the Crypt. However, halfway in the Crypt, you can improve your items again. Luna can get her Daedalus too, which is quite an important thing for her. Let me remind you, this is probably a good time to get the Unhallowed Icon artifact up and running. It’s time for the Odobenus Onslaught.
The Odobenus Onslaught
This area is easy to finish, especially if you cooperate well. There are 4 points you need to hold, and the middle one is probably the easiest one. So before you start the event and click ready, place yourselves on each of the switches. However gets clinched, he can always run away to his teammates and take care of that switch later. The artifacts remain the same, but the items are as following:
- Luna – Sange and Yasha, Daedalus, Morbid Mask
- Witch Doctor – Guardian Greaves, Aghanim’s Scepter
- Sven – Mask of Madness, Daedalus, Sange and Yasha
- Zeus – Arcane Boots, Veil of Discord, Aghanim’s Scepter, Preparing for his Octarine Core
Let’s move towards Reef’s Edge.
Reef’s Edge
Reef’s Edge is easy to beat, and this is where most of your teammates have to equip Carapace of Qaldin. All the NPCs will just vanish, and the Slarks won’t cause any problems. The plan is simple, let Sven tank the way through.
Useful Artifacts: Carapace of Qaldin
- Luna – Sange and Yasha, Daedalus, Morbid Mask
- Witch Doctor – Guardian Greaves, Aghanim’s Scepter, Working on Octarine core
- Sven – Mask of Madness, Daedalus, Sange and Yasha
- Zeus – Arcane Boots, Veil of Discord, Aghanim’s Scepter, Octarine Core
Not much has changed, and the Carapace of Qalding is the best late game artifact in Siltbreaker Act 2. That’s why we’re doing this guide including Artifacts, so it will be a lot easier for you to beat the Siltbreaker himself.
The Shoal
It’s time to encounter the Giant Amoeboid.
Useful Artifacts: Ambient Sorcery, Carapace of Qaldin, Unhallowed Icon, The Caustic Finale (For the time being).
By using the above-listed Artifacts, you’ll get the needed advantage already, and you’ll be more than able to burst the boss down without any further issues. Just make sure to avoid his Amoeboid spit and jump. But, you’ll be able to tank through that too, thanks to the Carapace of Qaldin and the Unhallowed Icon.
Items:
- Luna – Sange and Yasha, Daedalus, Morbid Mask, Monkey King Bar, Butterfly
- Witch Doctor – Guardian Greaves, Aghanim’s Scepter, Working on Octarine core
- Sven – Mask of Madness, Daedalus, Sange and Yasha, Assault Cuirass
- Zeus – Arcane Boots, Veil of Discord, Aghanim’s Scepter, Octarine Core
It’s simple, Zeus is combo-ing with Witch Doctor, while Sven and Luna do the physical damage. What differs from the Act 1, this Act doesn’t require some mad skills to complete it. All you need is the right items and picks. Also, when you get the better Artifacts drops in Act 2, you’ll be able to play different heroes and approach different strats.
Dark Reef Prison
If you want to finish this area on three stars, you better not rush things out, because you’ll manage to pull more AIs than you can even imagine. Knowing the fact that you have Zeus, the adds will just keep on coming. It is the only area where you need to develop your skills, but not on the highest level. The only thing you need to avoid is the Galvanite Gaoler electric storm, which deals an insane amount of damage.
Useful Artifacts: Carapace of Qaldin
Items:
- Luna – Sange and Yasha, Daedalus, Morbid Mask, Monkey King Bar, Butterfly, Carapace of Qaldin
- Witch Doctor – Guardian Greaves, Aghanim’s Scepter, Octarine Core, Carapace of Qaldin
- Sven – Mask of Madness, Gets Satanic Daedalus, Sange and Yasha, Assault Cuirass, Carapace of Qaldin
- Zeus – Gets rid of Arcane Boots, Gets Ambient Sorcery artifact on that slot (needed for the Siltbreaker). Veil of Discord, Aghanim’s Scepter, Octarine Core, Carapace of Qaldin
It’s time for the Siltbreaker himself.
Siltbreaker
As we fight our way to Siltbreaker’s lair, we had some ups and downs on the itemization while it was hard to control what kind of items everyone has. If something is confusing, make sure you preview the following itemization.
The final and most important itemization are as the following (as it is always in our Siltbreaker Act 2 games):
- Luna – Sange and Yasha, Daedalus, Satanic, Monkey King Bar, Butterfly, Moonshard, Carapace of Qaldin
- Witch Doctor – Guardian Greaves, Aghanim’s Scepter, Octarine Core, Solar Crest, Ambient Sorcery, Carapace of Qaldin
- Sven – Satanic, Daedalus, Assault Cuirass, Monkey King Bar, Moonshard, Carapace of Qaldin, Unhollowed Icon
- Zeus – Gets rid of Arcane Boots, Gets Refresher on that slot (needed for the Siltbreaker). Veil of Discord, Aghanim’s Scepter, Octarine Core, Dagon Level 5, Carapace of Qaldin
Whenever someone gets disabled by the green bubble, that’s where most of the players panic and no one takes any action. All you need to do is just attack your friend to destroy the bubble.
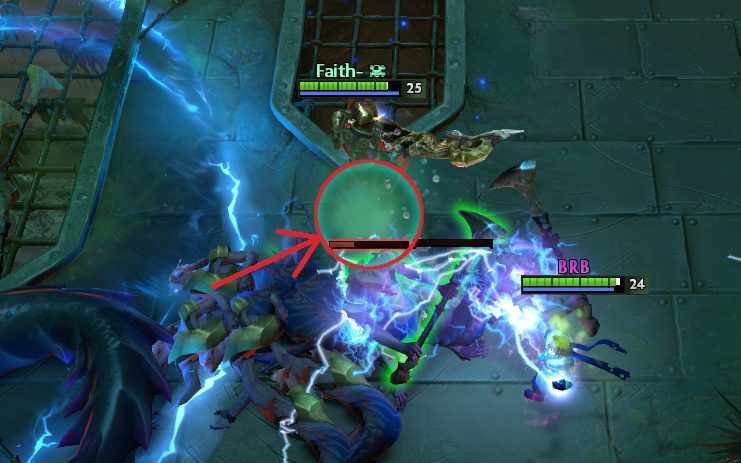
The second thing you need to pay attention to are the spawned Slardars and prevent them from healing the Siltbreaker. Check the image below:

Let’s be honest. You should be familiar with every other trigger, and animation Siltbreaker does. You shouldn’t expect to kill that boss if you don’t have visited his lair before, at least once. I honestly hope that this Siltbreaker Act 2 Guide will help you beat Siltbreaker easier. We do the thinking; you do the playing is what I love to say. Take care and do not forget to subscribe to dev.futuregamereleases.com.
We have also managed to kill Siltbreaker without dying, therefore we got the three stars achievement!