In CS2, precise grenade throws can differentiate between a round win or loss. As CS2 handles certain aspects differently than its predecessor, CS:GO, many players have found the need to create custom jump-throw binds. This guide will walk you through setting up an efficient jump-throw bind tailored for CS2.
While many believe that Valve will prevent such scripts from working, until it gets patched, you can use it all you want.
1. Setting up the Configuration File
Firstly, you’ll need to create a configuration file that the game will recognize and execute.
- Create a new text document and name it
autoexec.cfg. Ensure the file extension is “.cfg” and not “.txt”. - Open the file in a text editor, and paste the following:
//jumpthrow
alias “+jumpaction” “+jump;”
alias “+throwaction” “-attack; -attack2”
alias “-jumpaction” “-jump”
bind alt “+jumpaction;+throwaction;”
//runthrow
alias “+runthrow” “+forward;+jump;”
alias “-runthrow” “-jump;-forward”
bind c “+runthrow;+throwaction”
In this script, two separate actions have been defined:
- Jumpthrow: This bind lets you jump and release the grenade at the optimal height for consistent throws. It is bound to the
Altkey. - Runthrow: A more advanced throw where you move forward, jump, and release the grenade. In our case, this is bound to the
Ckey.
*Keep in mind that you can change the keybinds on the last line of each script above.
- Save the file and close the text editor.
2. Placing the Config File
You’ll need to place this configuration file in the correct location.
- Navigate to:
\SteamLibrary\steamapps\common\Counter-Strike Global Offensive\game\csgo\cfg. - Drag and drop or copy-paste the
autoexec.cfgfile into this directory.
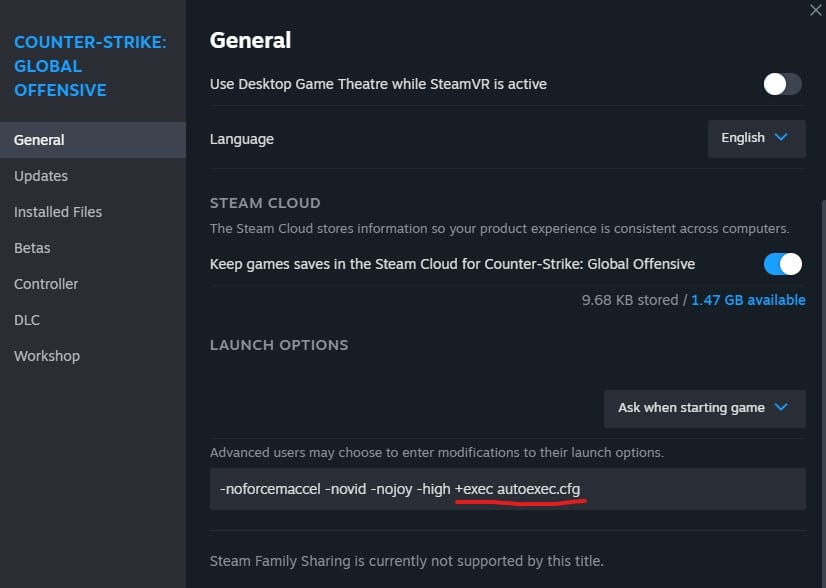
3. Configuring Steam’s Launch Options
To make sure the game reads and executes your custom configuration each time it launches:
- Open your Steam Library.
- Right-click on Counter-Strike Global Offensive (note: for CS2, the client launch is shared with CS:GO).
- Select Properties.
- Under the General tab, you’ll find the Launch Options.
- Add the following to the text box:
+exec autoexec.cfg. - Close the properties window. That’s it! Now launch the game and enjoy throwing some precise smokes!